


“It was a dark and rainy
night…”
This seems to be the way
that most of my recent blog-posts have started.
“It was a dark and rainy
night and I took shelter in a cocktail bar…”
That kind of thing.
Luckily for you guys, I usually erase it and try and find a different way to lead into a post.
Luckily for you guys, I usually erase it and try and find a different way to lead into a post.
It’s been Spring officially
for a fortnight now but the glimpses of warmer weather have been infrequent.
Rainy days are good for baking and blogging but they are also good for staying
in and doing the work that you have had to bring home. That work that suddenly
appeared while you were having a fantastic holiday in Sydney, and now seems
like a punishment for having enjoyed yourself too much.
But, having met the
deadlines for all the writing projects that have recently come my way, I
finally had a quiet, free weekend for the first time since I got back, and it
was time to get reacquainted with the kitchen.
I’ve been wanting to try and
‘ombre’ style cake for ages, but have been very aware that the trend (in cake,
in hair, in weddings) has now passed out of fashion. There are a thousand blogs
with a thousand clever ombre cakes out there. It isn’t new. It’s been
well-and-truly done before. Still, I have never been stylish and I wanted to have a go, just to say that I
had done it, so, with a sense of Spring in the air as I took my early morning
walk this morning, I decided that today was the day.
 |
| A patch of everlastings that I saw while I was out walking. It seems like Spring - but for how long? |
I chose the ‘narcissus’
colour theme because to me, any daffodil-sighting means that real Spring cannot be
too far away. This meant yellow food-colouring – lots of it. I didn’t buy
gel-colouring. I didn’t buy organic colouring. I shamelessly grovelled at the
shrine of the gods of Tartrazine and used bog-standard chemical colouring that
is found in any supermarket aisle. If you (or your cake-eating family and
friends) are the kind of person who objects to this, I am sure that you are
also possessed of the knowledge to find a healthier alternative, so when, in
the recipe, it says ‘yellow food colouring’, you will know exactly what to do.
 |
| The vanilla extract was organic though! |
Narcissus Ombre Cake
For the cake batter:
1 cup caster sugar
200g butter (melted)
2 eggs
1.5 cups milk
1 cup plain flour
1 cup SR flour
Yellow colouring (and 1 drop of red food colouring for the darkest layer)
For the lemon butter icing:
50g butter (melted)
Juice of 1 large lemon
3 cups of icing sugar,
sifted
To make the cake batter:
In a food processor, mix
melted butter and caster sugar until pale. Add eggs. Add the cup of plain
flour. Then add the milk. Then add the cup of SR flour and the vanilla essence and mix until completely combined.(Adding the flours separately seems to result in a smoother batter.)
Separate the cake batter
into 5 small bowls. Pour the (uncoloured) contents of one bowl into a standard
spring-form tin which has been lined with baking paper. Place in oven,
pre-heated to 200C, and bake for 15 minutes or until a skewer comes out clean.
While the first section is
baking, colour the other 4 portions of cake batter so that you have
progressively deeper shades of yellow. Adding a single drop of red colouring to the darkest layer will get you a much richer yellow. When you have coloured all bowls to your
satisfaction, repeat the baking step above with each portion of cake batter.
 |
| At this stage, your cake will look more like aioli, mustard and cheese sauce, but do not despair! All will be well. |
 |
| If they aren't perectly round, that's okay. Icing will hide a multitude of sins. ;) |
Place all layers of cake
onto wire trays and leave until completely cool.
To make the lemon butter icing:
Place the melted butter into
a mixing bowl, add sifted icing sugar and mix thoroughly. Gradually add lemon
juice until you have a mixture that is firm and not too thin. You want the kind of texture that will hold its shape and not be runny when you want to cover the cake.
To assemble the cake:
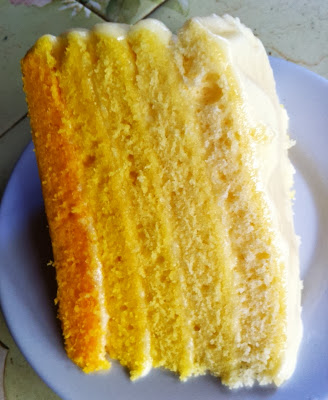
Starting with the darkest
layer and working up to the uncoloured layer, stick each layer of cake together
with the thin covering of lemon butter icing (you don’t want the icing to be
obvious, because it will spoil the seamlessness of the ombre effect).
Use remaining icing to cover
the top and sides of the cake.


To serve:
Cut each slice of cake using
a clean, warm knife (you can run it under the hot-water tap before drying it
off) to avoid smudging the layers when you cut the cake.

This is a pretty cake which
I decided to make prettier by using some jasmine and lemon blossom from the
garden, but some people actually go the distance and decorate their ombre cakes
with ombre icing on the outside. It’s up to you, really.
Me, I just wanted to
decorate the cake as quickly as possible, so I could cut a slice and eat it
outside in the sunshine. I’ve seen the weather report for tomorrow – it says ‘increasing
showers’ which means another dark and stormy night is on the horizon, and instead of being outside in the Spring weather, I
shall probably have to seek shelter in some bar…

